

To clean your kitchen exhaust fan with vinegar, simply remove the fan cover, soak it in a solution of vinegar and warm water, scrub it clean, and dry it before reattaching the cover. Are you tired of your kitchen exhaust fan being clogged with grease and dirt, causing poor ventilation and unpleasant odors?
Cleaning it regularly is essential for maintaining a healthy and clean kitchen environment. One effective and economical way to clean your kitchen exhaust fan is by using vinegar. Vinegar not only helps to break down grease but also acts as a natural disinfectant.
We will guide you through the step-by-step process of cleaning your kitchen exhaust fan with vinegar, allowing you to enjoy a fresh and odor-free kitchen once again.
Preparing For Cleaning Exhaust Fan
Before diving into the task of cleaning your kitchen exhaust fan, it’s essential to prepare yourself and gather the necessary materials. Taking the time to properly prepare will not only ensure a safe and effective cleaning process but also help maintain the longevity of your exhaust fan. In this section, we will explore the importance of regular cleaning, the safety measures you should take before starting, and the necessary materials you need to have at hand.
Importance Of Regular Cleaning
Regular cleaning of your kitchen exhaust fan is vital to ensure its optimal performance and longevity. Over time, grease, dirt, and other airborne particles accumulate in your exhaust fan. This buildup can impede the fan’s efficiency and cause it to work harder, leading to increased energy consumption. Additionally, a dirty exhaust fan can pose a fire hazard due to the accumulation of flammable grease. Therefore, regular cleaning not only improves the air quality in your kitchen but also helps prevent potential safety risks.
Safety Measures Before Starting
Before you begin cleaning your kitchen exhaust fan, it’s crucial to prioritize safety. Taking the necessary safety measures will protect you from injuries and accidents. Here are some safety precautions to consider:
- Switch off the power: Before anything else, turn off the power supply to the exhaust fan. This will prevent any chances of electrical shocks while cleaning.
- Protective gear: Wear appropriate protective gear, such as gloves and goggles, to shield yourself from chemicals and any debris that may dislodge during the cleaning process.
- Cover surrounding areas: Cover nearby countertops, appliances, and floors with plastic sheets or newspapers to prevent any splatters or mess.
- Secure the area: If your exhaust fan is positioned above a stove or cooktop, make sure to remove any loose or flammable materials, such as towels or curtains, from the area to avoid accidental ignition.
Gathering Necessary Materials
To ensure a hassle-free cleaning process, it’s important to gather the necessary materials beforehand. Here’s a list of items you may need:
| Materials | Description |
| Vinegar | A natural and effective cleaning agent that helps dissolve grease and remove unpleasant odors. |
| Warm water | Used in combination with vinegar to create a cleaning solution. |
| Spray bottle | Allows for easy application of the vinegar and water mixture onto the exhaust fan surfaces. |
| Microfiber cloth | An absorbent cloth that is ideal for wiping down and cleaning delicate surfaces without leaving scratches. |
| Clean sponge or brush | Used to remove stubborn stains or grime from the exhaust fan surfaces. |
| Screwdriver or wrench | May be needed to detach the exhaust fan for thorough cleaning in some cases. |
| Clean bucket | Useful for soaking and cleaning removable exhaust fan parts. |
| Cleaning gloves | Provides protection for your hands while handling cleaning solutions and dirt. |
| Dish soap | Used to remove grease and grime from removable parts of the exhaust fan. |
Vinegar: Natural Cleaning Agent
Vinegar is a natural cleaning agent that has been used for centuries due to its powerful properties. It is an effective and eco-friendly solution that can be used to clean various household items, including the kitchen exhaust fan. The acidity of vinegar helps to break down grease, grime, and odors, leaving your kitchen exhaust fan clean and fresh.
Benefits Of Using Vinegar
Using vinegar to clean your kitchen exhaust fan comes with several benefits:
- Environmentally friendly: Vinegar is a natural and non-toxic cleaner, making it a safer alternative to harsh chemicals. It is biodegradable and does not harm the environment.
- Cost-effective: Vinegar is an inexpensive cleaning solution that can be found in most households. By using vinegar, you can save money on expensive cleaning products.
- Effective grease remover: The acidity of vinegar helps to cut through grease and grime, leaving your kitchen exhaust fan spotless. It removes built-up grease that can accumulate on the fan blades and clog the ventilation system.
- Natural deodorizer: Vinegar is a powerful deodorizer that eliminates unpleasant odors. It can help neutralize the smell of cooking fumes that get trapped in the kitchen exhaust fan.
- Safe for various surfaces: Vinegar can be used on a variety of surfaces, including metal, plastic, and glass. It is gentle enough to not cause any damage or scratches.
Preparing Vinegar Solution
To clean your kitchen exhaust fan with vinegar, you will need to prepare a vinegar solution. Here’s a step-by-step guide:
- Gather the ingredients: You will need white distilled vinegar, water, a spray bottle, and a clean cloth.
- Mix the solution: In the spray bottle, combine equal parts of vinegar and water. Shake the bottle well to ensure the solution is thoroughly mixed.
- Detach the fan cover: Depending on the type of kitchen exhaust fan, you may need to remove the fan cover. Consult the manufacturer’s instructions or use a screwdriver if necessary.
- Spray the solution: Generously spray the vinegar solution onto the fan blades, ensuring full coverage. Let it sit for a few minutes to allow the vinegar to penetrate and loosen the grease and grime.
- Wipe clean: Using a clean cloth, gently wipe away the dirt and residue from the fan blades. Repeat the process until the blades are clean and free from any grime.
- Rinse and dry: If the fan cover is removable, rinse it with water and dry it thoroughly before reattaching it. Otherwise, use a damp cloth to wipe away any remaining vinegar residue, and let it air dry.
Using vinegar as a natural cleaning agent is a smart and effective way to keep your kitchen exhaust fan clean. Not only does it remove grease and grime, but it also helps to eliminate odors, leaving your kitchen smelling fresh and clean.
Dismantling The Exhaust Fan
Keeping your kitchen exhaust fan clean is essential for maintaining good air quality and preventing the buildup of grease and grime. One effective and natural way to accomplish this is by using vinegar. In this section, we will guide you through the process of dismantling the exhaust fan, ensuring a thorough cleaning.
Steps To Safely Remove Fan Components
Before starting to dismantle the exhaust fan, make sure to turn off the power supply to avoid any accidents. Follow these steps to safely remove the fan components:
- Start by loosening the screws or clamps that secure the fan cover in place. Use a screwdriver or pliers to do this, depending on the type of fastening.
- Once the screws or clamps are removed, carefully take off the fan cover and set it aside.
- You will then see the fan blades. Use caution as you handle them to avoid any damage. Gently pull or unscrew the blades, depending on the design of your exhaust fan.
- Next, locate and remove the motor assembly. It is usually held in place by screws or brackets. Use the appropriate tools to loosen and detach it from the fan housing.
- If there are any additional components attached to the fan housing, such as wires or sensors, carefully disconnect them according to the manufacturer’s instructions.
Organizing Parts For Easy Reassembly
Properly organizing the dismantled parts of your kitchen exhaust fan will make the reassembly process much smoother. Here are some tips for organizing the parts:
- Before you begin dismantling, prepare a clean and clutter-free work area. Lay down a soft cloth or some newspaper to protect the surface and prevent small parts from rolling away.
- As you remove each component, place them systematically in separate containers or labeled zip-lock bags. This will help you remember the order and location of each part during reassembly.
- Consider taking pictures or making notes to document the process and ensure you have a visual reference for the correct placement of each component.
By organizing the dismantled parts, you will save time and frustration when it comes time to put everything back together. Keep in mind that different exhaust fan models may have slight variations in their components and disassembly process, so consulting the manufacturer’s manual or website can provide specific guidance.
Applying Vinegar Solution
Clean your kitchen exhaust fan easily with a vinegar solution. Simply mix vinegar and water, apply the solution to the fan, and let it do its magic. A natural and effective way to keep your kitchen exhaust fan clean and odor-free.
How To Clean Kitchen Exhaust Fan With Vinegar
One of the most effective and budget-friendly ways to clean your kitchen exhaust fan is by using vinegar. Vinegar is a versatile and natural cleaning agent that can help break down grease and grime buildup on your fan. In this section, we will walk you through the techniques for effectively removing grime from your kitchen exhaust fan using a vinegar solution.
Techniques For Effective Grime Removal
Here are step-by-step instructions on how to clean your kitchen exhaust fan with vinegar:
- Step 1: Disconnect and Prepare
Before cleaning your kitchen exhaust fan, ensure that it is unplugged or disconnected from the power source to avoid any accidents. Additionally, place a drop cloth or newspaper beneath the fan to catch any drips or debris.
- Step 2: Remove the Grease Filters
The first thing you need to do is remove the grease filters from the exhaust fan. These filters are usually located underneath or behind the fan and can be easily taken out by following the manufacturer’s instructions. Once removed, you can clean them separately using the vinegar solution.
- Step 3: Create the Vinegar Solution
Mix equal parts of white vinegar and warm water in a bowl or bucket. The acidic properties of vinegar help to cut through grease and remove stubborn stains from your kitchen exhaust fan. This solution is an affordable and eco-friendly alternative to harsh chemical cleaners.
- Step 4: Apply the Vinegar Solution
Dip a sponge or a microfiber cloth in the vinegar solution and gently scrub the surfaces of your kitchen exhaust fan. Pay close attention to areas with heavy grease or grime buildup. The vinegar will loosen the dirt, making it easier to wipe away.
- Step 5: Wipe and Rinse
After scrubbing the fan with the vinegar solution, use a clean cloth or sponge soaked in plain water to wipe away any residue. This step helps to remove any remaining vinegar smell and ensures a streak-free finish. Make sure to thoroughly rinse and wring out the cloth or sponge before wiping the fan to avoid excess water dripping onto the appliance.
- Step 6: Dry and Reassemble
Allow your kitchen exhaust fan to air dry completely before reassembling the grease filters. Once the fan is dry, insert the cleaned filters back into their respective places. Ensure they are securely fitted before plugging the fan back in or reconnecting it to the power source.
Remember to clean your kitchen exhaust fan regularly to prevent the buildup of grease and improve its overall efficiency. Using a vinegar solution not only helps to keep your fan clean but also contributes to a healthier and fresher kitchen environment.
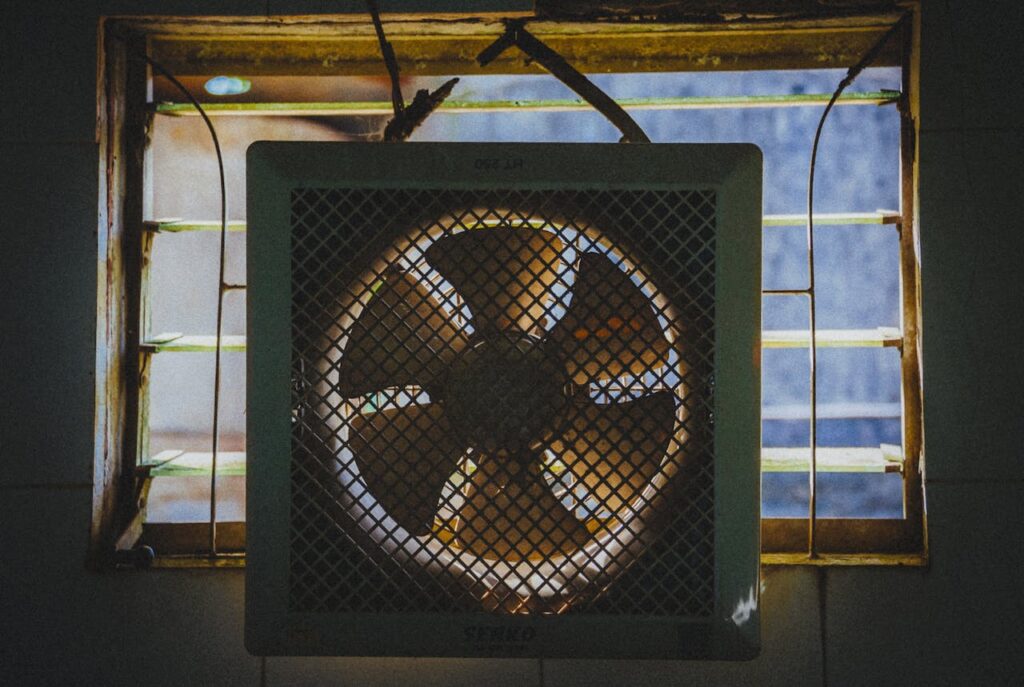
Cleaning Blades And Filters
To clean your kitchen exhaust fan, use vinegar to effectively clean the blades and filters. This natural solution helps remove grease and grime, ensuring your fan works efficiently for a cleaner kitchen environment.
Detailed Process For Cleaning Fan Blades
Your kitchen exhaust fan works hard to keep your kitchen smoke-free and smelling fresh. Over time, grease and grime can build up on the blades, reducing the effectiveness of the fan and potentially becoming a fire hazard. Regular cleaning of the fan blades is essential to maintain its performance. Below is a detailed step-by-step process to clean your kitchen exhaust fan blades effectively:
- Turn off the power: Before you begin cleaning, ensure the fan is turned off and disconnected from the power source. Safety should be your top priority.
- Remove the fan cover: Most kitchen exhaust fans have a removable cover that allows access to the blades. Carefully remove the cover and place it aside.
- Wipe away loose debris: Use a dry cloth or a brush to remove any loose dust or grease from the blades. Start from the center and work your way outwards to cover the entire surface area.
- Prepare a vinegar solution: In a bowl, mix equal parts of vinegar and water. Vinegar is an excellent natural cleanser that removes grease and grime effectively.
- Soak a cloth: Dip a cloth or sponge in the vinegar mixture, ensuring it is not soaking wet. Squeeze out excess liquid before cleaning the blades.
- Clean the blades: Gently wipe each blade with the vinegar-soaked cloth. Pay special attention to any areas with stubborn grease buildup. Repeat this process until all the blades are clean and free from residue.
- Dry the blades: After cleaning, use a dry cloth to remove any remaining moisture from the blades. Leaving them wet can promote the growth of mold or mildew.
- Reassemble the fan: Once the blades are completely dry, reattach the fan cover securely. Make sure it fits correctly to avoid any loose parts.
Washing Filters With Vinegar Mix
The filters of your kitchen exhaust fan play a vital role in capturing grease particles and preventing them from entering the ductwork. It is essential to clean these filters regularly to maintain optimal performance. Utilizing a vinegar mixture is an effective and eco-friendly way to remove grease from the filters. Follow the steps below to wash your filters with a vinegar mix:
- Remove the filters: Depending on the type of fan, the filters may be located behind the fan cover or under the hood. Carefully remove the filters from their designated position.
- Inspect the filters: Check for any visible damage or excessive buildup of grease. If the filters are severely damaged, it may be necessary to replace them.
- Prepare a vinegar solution: In a large basin or sink, combine equal parts of vinegar and hot water. This mixture will break down the grease and eliminate unpleasant odors.
- Submerge the filters: Place the filters in the vinegar mixture, ensuring they are fully submerged. Let them soak for at least 15-20 minutes to allow the vinegar to loosen the grease.
- Scrub the filters: After soaking, use a soft brush or sponge to gently scrub the filters. Focus on areas with heavy grease buildup, applying a bit more pressure if needed. The vinegar mixture will help break down the grease, making it easier to remove.
- Rinse the filters: Once you have thoroughly scrubbed the filters, rinse them under running water to remove any remaining vinegar and loosened grease. Ensure all traces of vinegar are gone.
- Dry the filters: Shake off excess water and pat the filters dry with a clean towel. Alternatively, let them air dry completely before reattaching them to the fan.
- Reinstall the filters: Once the filters are dry, securely reinstall them in their original position. Make sure they fit snugly to prevent any air leakage.
Ensuring Thorough Rinse And Dry
To ensure a thorough rinse and dry when cleaning your kitchen exhaust fan with vinegar, make sure to remove the fan cover and soak it in a mix of vinegar and warm water. Scrub away any grease and grime before rinsing and drying completely.
Rinsing Components After Vinegar Application
After applying vinegar to your kitchen exhaust fan components, it is important to thoroughly rinse them to remove any residue and ensure a clean and fresh result. Vinegar is a natural and effective cleaning agent that can cut through grease and grime, but leaving it on for too long can cause damage to the materials. Here are the steps you can follow to rinse the components properly:
- Start by removing the components that need to be rinsed, such as the fan blades, filters, and covers. Place them in a sink or tub.
- Use warm water to rinse off the vinegar and any loosened dirt or grease. Make sure to rinse each component thoroughly, paying close attention to hard-to-reach areas.
- If there are still stubborn stains or residue, you can use a soft sponge or brush to gently scrub the components while rinsing. Be careful not to scratch or damage the surfaces.
- Once all the components have been rinsed, inspect them to ensure there is no remaining residue or dirt. Repeat the rinsing process if necessary.
- When you are satisfied with the cleanliness of the components, use a clean towel or cloth to pat them dry.
Best Practices For Drying Parts, Ensuring
After rinsing the kitchen exhaust fan components, it is crucial to dry them properly to prevent any moisture buildup, which can lead to mold and mildew growth. Follow these best practices for drying the parts and guaranteeing their longevity:
- Air-drying is often the best method for drying the components. Place them in a well-ventilated area with good air circulation.
- Avoid using heat sources such as hairdryers or heaters to speed up the drying process. High heat can cause damage to the materials.
- If you are in a hurry and need to dry the components quickly, you can use a clean towel or cloth to gently pat them dry. Make sure to remove as much moisture as possible.
- Before reassembling the exhaust fan, ensure that all parts are completely dry. Any residual moisture can lead to unwanted odors and potentially affect the performance of the fan.
Remember, proper rinsing and drying are essential steps in cleaning your kitchen exhaust fan. By following these guidelines, you can maintain a clean and efficient fan that helps keep your kitchen fresh and odor-free.
Reassembling The Exhaust Fan
After successfully cleaning your kitchen exhaust fan with vinegar and giving it a new lease on life, it’s time to put all the parts back together. Reassembling the exhaust fan may seem like a daunting task, but with the right guidelines and tips, you can ensure that your fan functions properly and brings fresh air back into your kitchen.
Guidelines For Putting Parts Back Together
Follow these guidelines to make sure you reassemble your kitchen exhaust fan correctly:
- Refer to the manufacturer’s manual: Before you start putting the parts back together, refer to the manufacturer’s manual to understand the proper order and placement of each component. This will help avoid any confusion and ensure that you assemble the fan correctly.
- Organize the components: Lay out all the cleaned components in front of you, making sure each part is easily accessible. This will help you keep track of the different pieces and prevent any lost or misplaced parts during the reassembly process.
- Take it one step at a time: Reassemble the exhaust fan step by step, starting with the base or frame and gradually adding the other components in the correct order. This will help you maintain a systematic approach and reduce the chances of errors.
- Secure the parts properly: As you reassemble the fan, ensure that each component is securely attached or fastened. Avoid loose connections or gaps, as they can affect the performance and efficiency of the exhaust fan.
- Double-check everything: Once you have put all the parts back together, give the fan a thorough inspection. Make sure all the connections are tight, there are no loose screws or bolts, and the fan rotates smoothly without any obstruction.
Tips To Ensure Proper Functioning After Cleaning
Now that you have successfully reassembled your kitchen exhaust fan, here are some tips to ensure its proper functioning:
- Regular maintenance: Clean your exhaust fan regularly to prevent the accumulation of grease and dirt, which can hinder its performance. Make cleaning the fan a part of your routine kitchen maintenance.
- Check for blockages: Periodically check the fan for any blockages or debris that might impede airflow. Clear away any obstacles to maintain optimal ventilation in your kitchen.
- Monitor fan noise: Pay attention to any unusual noise coming from the fan. Excessive noise could indicate loose components or damage, requiring further inspection and possible repairs.
- Replace worn-out parts: If you notice any worn-out or damaged parts during the reassembly process or regular maintenance, replace them promptly to avoid compromising the efficiency and safety of your exhaust fan.
- Seek professional help if needed: If you encounter any difficulties during the reassembly process or suspect a more significant underlying issue with your exhaust fan, don’t hesitate to seek professional assistance. A qualified technician will ensure your fan is in top-notch condition and functioning optimally.
Frequently Asked Questions On How To Clean Kitchen Exhaust Fan With Vinegar
How Do You Clean A Kitchen Exhaust Fan With Vinegar?
To clean a kitchen exhaust fan with vinegar, mix equal parts of white vinegar and water in a spray bottle. Spray the solution onto the fan blades and let it sit for a few minutes. Then, wipe away the grime and grease with a clean cloth or sponge.
Why Should You Clean Your Kitchen Exhaust Fan?
Cleaning your kitchen exhaust fan regularly is important to maintain good air quality and prevent grease build-up. A dirty exhaust fan can be a fire hazard and can also affect the efficiency of the fan, reducing its ability to remove smoke, odors, and humidity from the kitchen.
How Often Should You Clean Your Kitchen Exhaust Fan?
It is recommended to clean your kitchen exhaust fan at least once every three months. However, if you do a lot of cooking or notice excessive grease build-up, it may need to be cleaned more frequently. Regular cleaning will ensure optimal performance and prevent any health and safety issues.
Conclusion
Cleaning your kitchen exhaust fan is crucial for maintaining a healthy and safe cooking environment. By using vinegar as a natural cleaning solution, you can effectively remove grease, grime, and odors from your fan. With the simple steps outlined in this blog post, you can easily tackle this task and enjoy a cleaner and more efficient kitchen.
Say goodbye to a greasy and smoky kitchen and hello to a fresh and inviting cooking space. Start cleaning your kitchen exhaust fan with vinegar today and reap the benefits of a cleaner and healthier kitchen.

